
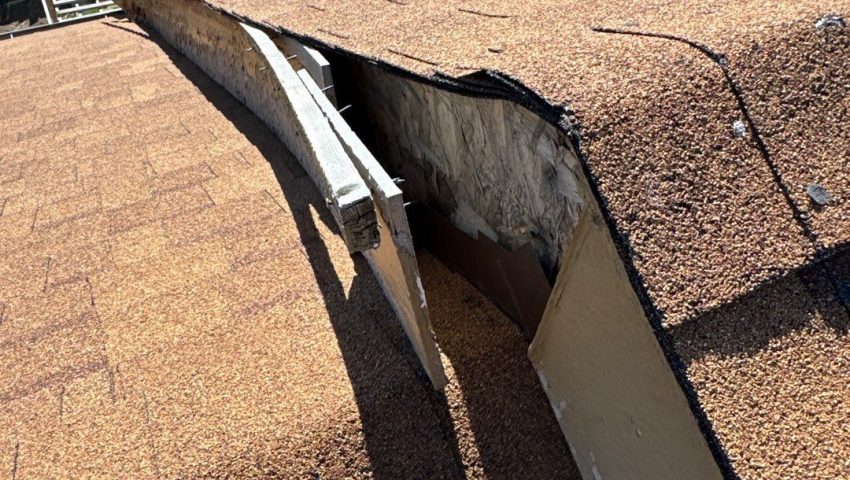
A sudden leak after a hailstorm can feel like a race against time, especially when the roof is your home’s first line of defense.
Understanding the warning signs and the right steps to take can keep water out, protect your belongings, and save money on larger repairs.
If a roof starts leaking within hours of a storm, act fast to stop water, document damage, and call a qualified crew. Delaying can turn a small breach into costly structural harm.
When a storm passes over Denver, Aurora, Littleton, Parker, or Centennial, the next few hours are critical for roof health. A tiny puncture can let in rain, snow, or even wind‑driven debris, leading to hidden rot and mold.
This guide walks you through the moments that matter, the tools professionals use, and how to work with insurers so you’re not left guessing.
Why Most Storm Damage Gets Worse in the First 24 Hours
In the hours after a hailstorm, wind gusts can lift loose shingles, exposing the underlayment to rain. The moisture that seeps through quickly saturates the decking, and the weight of wet wood can cause sagging.
Colorado’s high altitude also means rapid temperature swings, which expand and contract roof materials faster than in lower elevations. That stress can turn a minor crack into a full‑width leak before the sun even rises.
Key Factors
- Moisture Absorption: Wet decking swells, reducing its load‑bearing capacity and making it easier for wind to lift damaged sections.
- Thermal Expansion: Temperature shifts cause metal fasteners to loosen, allowing shingles to shift and gaps to open.
- Debris Accumulation: Hail and wind drop branches and debris that can puncture underlayment, creating hidden pathways for water.
- Delayed Inspection: Homeowners who wait for daylight often miss early signs, allowing water to spread unnoticed.
Because the damage can compound quickly, the best defense is a rapid visual check and a temporary barrier. Spotting a loose shingle or a wet spot early can prevent a cascade of problems that would otherwise require extensive repairs.
The Temporary Fix That Actually Protects Until Crews Arrive
A well‑installed tarp can act as a waterproof shield, but it must be secured against wind uplift and properly overlapped to avoid water pooling. In Denver’s gusty spring winds, a loose edge can become a wind sail, pulling the tarp off and exposing the roof again.
Choosing the right material matters. Heavy‑duty polyethylene tarps resist tearing from hail, while reflective white tarps reduce heat buildup that could melt sealants on hot summer days.
A quick comparison of common temporary roofing materials helps you decide which option fits your situation best.
| Material | Wind Rating | UV Resistance | Cost per Square Foot |
|---|---|---|---|
| Heavy‑duty polyethylene | Up to 70 mph | Moderate | $1.20 |
| White reflective tarp | Up to 60 mph | High | $1.45 |
| Self‑adhesive membrane | Up to 80 mph | High | $2.10 |
Effective Tarping Tips
- Secure Fastening: Use rust‑proof nails or screws with washers, spacing them no more than 12 inches apart to meet wind uplift standards.
- Overlap Strategy: Overlap each strip by at least 6 inches, sealing seams with a high‑temperature roofing cement approved by the NRCA.
- Ventilation Consideration: Leave a small vent at the highest point to allow trapped moisture to escape, preventing condensation under the tarp.
When a professional crew arrives, they’ll replace the temporary system with a permanent repair that meets Denver building code requirements. Until then, a correctly installed tarp can keep your home dry and your peace of mind intact.
What Your Insurance Adjuster Looks for During Emergency Roof Inspections
Adjusters focus on evidence that the damage was sudden and that the homeowner took reasonable steps to mitigate further loss. They’ll examine the roof’s surface, the underlayment, and any visible structural compromise.
In Colorado, the NRCA recommends documenting the condition with photos, moisture meter readings, and a written log of actions taken within the first 24 hours.
Adjuster Checklist
- Photographic Evidence: Clear, time‑stamped images of the damaged area, the tarp installation, and any interior water stains.
- Moisture Mapping: Use a moisture meter to record readings on decking and insulation, showing the extent of saturation.
- Repair Timeline: Provide a written record of when the leak was discovered, when the temporary fix was applied, and when the professional crew was contacted.
- Material Samples: Preserve a piece of the damaged shingle or membrane for lab analysis if the insurer requests verification.
- Code Compliance: Note that the temporary repair follows OSHA fall protection guidelines and local building code provisions.
By presenting this documentation, you demonstrate proactive mitigation, which insurers view favorably. It also speeds up the claims process, getting you back to a fully restored roof sooner.
When a Tarp Job Costs More Than It Saves
A tarp is cheap in theory, but hidden costs can add up quickly. If the roof surface is uneven, you may need extra decking or shims to create a flat plane, which increases labor and material expenses.
In areas like Littleton and Parker, where hail can puncture multiple layers, a tarp may need frequent adjustments, turning a short‑term fix into a costly, ongoing project.
A side‑by‑side look at typical tarp scenarios highlights where expenses can spiral.
| Scenario | Estimated Labor Hours | Material Cost | Potential Hidden Costs |
|---|---|---|---|
| Flat roof, minor leak | 2 | $150 | None |
| Steep slope, hail damage | 5 | $300 | $200 for extra decking |
| Complex geometry, wind uplift | 8 | $450 | $500 for safety equipment |
Cost‑Benefit Factors
- Installation Time: Complex roof shapes require more crew hours, raising labor costs beyond the tarp price alone.
- Material Waste: Over‑lappinglapping and sealing can waste sealant, especially if the surface is already compromised by hail dents.
- Future Damage: An improperly secured tarp can trap moisture, leading to rot that costs far more to repair than a permanent roof replacement.
- Insurance Limits: Some policies cap reimbursement for temporary fixes, leaving the homeowner to cover excess expenses.
- Safety Risks: Working on a compromised roof without proper fall protection can result in injuries, adding liability costs.
If the projected hidden costs approach or exceed the price of a permanent repair, it’s wiser to wait for a qualified crew. A short‑term tarp may feel safe, but the long‑term financial impact can be significant.
How We Prioritize Emergency Calls During Peak Storm Season
During Colorado’s stormy months, crews receive dozens of calls each day. Prioritization hinges on the severity of water intrusion, the risk to occupants, and the potential for structural damage.
Calls from homes with active leaks, especially those with children or elderly residents, move to the top of the queue, while cosmetic damage follows later.
Prioritization Rules
- Active Water Flow: Any roof that is still letting water inside receives immediate dispatch.
- Occupant Safety: Homes with exposed wiring or electrical panels near the leak are flagged for rapid response.
- Structural Concerns: Reports of sagging ceilings or visible roof collapse trigger priority status.
- Geographic Clustering: Calls from the same neighborhood are grouped to minimize travel time and maximize crew efficiency.
- Insurance Deadlines: Requests that align with insurer‑mandated mitigation windows are fast‑tracked to avoid claim denial.
By applying these rules, crews can address the most dangerous situations first, ensuring that families in Denver, Aurora, Littleton, Parker, and Centennial receive the protection they need when storms strike.
The Hidden Damage That Shows Up Days After the Leak Stops
Even after a tarp stops the rain, water can linger in insulation, drywall, and framing. This hidden moisture creates an environment for mold, rot, and even pest infestations.
In Colorado’s cold winters, freeze‑thaw cycles can expand trapped water, cracking wood fibers and weakening the roof deck over time.
Signs of Hidden Damage
- Musty Odor: A persistent damp smell in the attic or upper rooms often signals lingering moisture.
- Staining: Yellow or brown stains on ceilings and walls appear days after the leak is stopped.
- Soft Spots: Pressing on drywall reveals spongy areas where water has saturated the material.
- Mold Growth: Black or green patches on insulation or framing indicate fungal activity.
Identifying these clues early lets you schedule a thorough inspection and targeted repairs, preventing long‑term health hazards and costly structural remediation.
Why Permanent Repairs Should Wait Until After the Emergency Stabilization
A rushed permanent fix can overlook underlying issues that caused the leak. Stabilizing the roof first ensures the structure is dry, safe, and ready for a lasting solution.
In the Denver metro area, the combination of hail, wind, and temperature swings means that hidden damage often emerges only after the roof has been fully dried.
Stabilization Benefits
- Accurate Assessment: Dry conditions allow contractors to locate all compromised components, not just the visible ones.
- Material Compatibility: Waiting ensures that new shingles or membranes adhere properly to a dry, clean surface.
- Warranty Protection: Manufacturers require a dry substrate for warranty eligibility, so premature installation can void coverage.
- Cost Efficiency: Addressing all issues at once avoids repeat visits and additional material waste.
By letting the emergency phase finish before committing to a full replacement, homeowners protect their investment and guarantee that the new roof will perform as designed for years to come.
Securing Your Roof After a Storm
Emergency roof repairs are a race against time, but knowing the right steps can keep your home dry and your wallet intact. From rapid tarp installation to thorough documentation for insurers, each action builds a stronger defense against hidden damage.
If you suspect a leak, act quickly, call a qualified crew, and consider a professional roof inspection to verify the repair’s success. A timely response protects your family, preserves property value, and eases the insurance process.
Author
JJ Hedden is a seasoned roofing professional who has guided countless homeowners through emergency repairs across Denver and surrounding communities. His hands‑on experience with storm‑damage scenarios informs the practical advice shared in this article.